The Nintendo Switch is a cool gaming device that can make your gaming experience more exciting. If you want to make it even better, you can connect it to a projector to play games on a big screen. For this purpose you can connect Nintendo switch to a projector. If you are wondering how to connect Nintendo Switch to projector? Don’t worry if you don’t know how to do it – we’ve got a simple guide for you! Whether you’re a casual gamer or a big fan, just follow these easy steps, and you’ll be enjoying your games in a whole new way!
How To Connect Nintendo Switch To Projector? Two Different Ways
Using a Nintendo switch on a projector is a great experience as it increases the gaming experience to two folds. There are two ways to connect Nintendo Switch one is with a dock and the other is without using dock. We are here to provide you with a complete guide to connect Nintendo switch in both ways. Are you ready?
Let’s Get Started!
Connect Nintendo Switch To Projector (With Dock)
Step 1: Connect HDMI And Ac Adapter To Nintendo Switch Dock
For connecting Nintendo switch to a projector the dock is very important component. The dock of Nintendo switch contains all the necessary ports which are essential for connectivity of Nintendo switch to projector. First of all, Start by taking off the back cover of the Dock and plug the wall adapter into the first port. Next, attach one end of the HDMI cable to the 3rd port on the Dock. If your projector is on the ceiling, use a longer HDMI cable for the connection. If you happen to lose or can’t find your Nintendo Switch Dock, you have options. You can purchase a replacement separately or explore more affordable alternatives by considering aftermarket docks.
Step 2: Pair Controllers With Nintendo Switch Console
Start by connecting the joy-con controllers to the Nintendo Switch console to ensure they are paired. Without pairing, the console won’t recognize the controllers. After pairing, detach the controllers and attach them to the included joy-con grip. Ensure that the joy-con controllers are adequately charged for a smooth gaming experience.
- Important: To detach the joy-con controllers, press the black button located on the back of each joy-con controller.
Step 3: Place the Nintendo Switch Console into the Dock
To link your Nintendo Switch to a projector, insert the Nintendo Switch console into the Dock to display its content on the projector. Simply position the console on the dock, ensuring a secure connection between the console and the dock’s USB-C port. Once the console is connected to the Dock, the console’s screen will turn off automatically.
Step 4: Connect the Dock to Projector
To link the Nintendo Switch dock to the projector, plug the other end of the HDMI cable into the HDMI port on the projector. If your projector lacks an HDMI port, you’ll require a suitable HDMI adapter.
For instance, if your projector has a VGA port, utilize an HDMI female to VGA male adapter. This solution ensures you can connect your Nintendo Switch to a projector even if there’s no HDMI port available.
Step 5: Power ON both devices and Verify the Connection
In the last step, turn ON both the Nintendo Switch dock and the projector. Then, set the source to HDMI on your projector. If your projector has multiple HDMI inputs, choose the right one. Use either the ‘Input Source’ button on your projector or the projector’s remote control to select the correct input source. Once you’ve chosen the right input source, congratulations! You’re all set to enjoy playing Nintendo Switch games on your projector screen.
Connect Nintendo Switch To Projector (Without Dock)
If you’ve owned your Nintendo Switch for a while, it’s possible that the Dock may be lost or damaged due to its lightweight design. In such a situation, you have a couple of options: you can either purchase the official Nintendo Dock or explore aftermarket alternatives. However, it’s also entirely feasible to connect your Nintendo Switch console to a projector without using a dock.
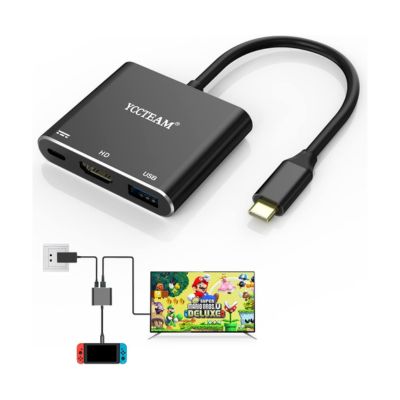
Here’s how: Instead of a dock, you’ll need a Switch HDMI adapter to establish this connection.
YCCTEAM Switch Dock

Specifications
- The Multiport Switch Dock is made of Aluminum alloy lightweight material and has a built-in high-efficiency chip. Perfect compatible with Nintendo Switch/ Switch OLED, and adapter for high-definition TVs, computer, Android phone, and more with USB c interface, without additional drivers. Support Nintendo switch systems version 4.1.0 and above.
These are the 5 basic steps to connect Nintendo Switch to projector (Without Dock)
- Ensure your Nintendo Switch Console is adequately charged, and the joy-con controllers are paired with it.
- Link the Switch HDMI adapter to the Nintendo Switch console’s USB-C port using the provided USB-C cable.
- Connect a USB-C wall adapter to the charging port on the adapter (CRUCIAL).
- Establish a connection between the Switch HDMI adapter and the projector using an HDMI cable.
- Choose the correct HDMI source and verify the connection.
Using the method outlined above, connecting your Nintendo Switch to a projector without a dock is a breeze. Moreover, the Switch HDMI adapter serves multiple purposes, allowing you to connect not only your Nintendo Switch but also your laptop, mobile, and tablet to the projector effortlessly.

Conclusion
I hope this guide has made it easy for you to understand how to connect your Nintendo Switch to a projector. The process takes just a couple of minutes, and you’ll be ready to start playing right away. If you encounter any issues while following these steps, feel free to drop a comment below. I’ll respond promptly to address your concerns and assist you in setting up your Nintendo Switch games on the projector.
Furthermore, even if you don’t have a Nintendo Switch Dock, you can still connect your console to the projector using a Switch HDMI adapter. This versatile solution opens up new possibilities for enjoying your gaming experience on a larger screen.
FAQs
Can you project Nintendo Switch to monitor?
Yes, you can project your Nintendo Switch to a monitor. Use the Nintendo Switch Dock, connect it to the monitor via HDMI, and select the corresponding input on the monitor. This allows you to play your Nintendo Switch games on a larger screen, offering a different gaming experience.
Can you connect a Nintendo Switch to a PC?
Connecting a Nintendo Switch to a PC directly isn’t supported. The Switch lacks video input capability. However, you can use a capture card to display the Switch’s output on a PC monitor. Connect the Switch to the capture card, and the card to the PC via USB or PCIe, enabling gameplay on the PC.
How much does a Nintendo Switch Dock costs?
The official Nintendo Switch Dock is typically priced around $80. However, prices can vary based on location, availability, and any potential sales or discounts

